Visualizzazione post con etichetta tutorial. Mostra tutti i post

02/09/16

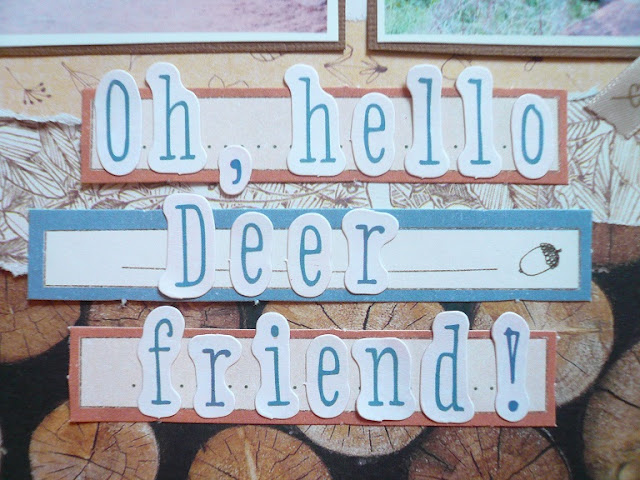
[Docrafts] - "Oh, hello deer friend!" layout tutorial

This post is in Italian and English
Oggi vi mostro un layout come DT per Docrafts! Ho utilizzato la collezione "Tales from Willson Wood", che è davvero tenera e dolcissima: ci sono tanti animaletti del bosco (gufi, scoiattoli, porcospini, volpi...) e delle fantasie davvero dolciose. Scoprite tutta la collezione quiToday I have for you a LO with the fabulous Docrafts collection "Tales from Willson Wood": it features cute woodland creatures and patterns, so sweet! Discover the whole collection here.

Questa collezione è davvero bellissima, ha colori delicati e queste fantasie adorabili! Inoltre il pack con i die-cut contiene un sacco di sentiment, tag, e altre cosine bellissime per i nostri progetti (io adoro usarlo per le card!). Potete vedere nei dettagli come ho usato appunto alcuni di questi die-cut.This collection is super sweet with adorable patterns and embellishments. I especially love the die-cut paper pack: here you can see how I used some of the lovely die-cuts in the package...


Product used


Trovate il tutorial per realizzare questo layout qui sul sito Docrafts.Here on Docrafts site you can find the tutorial to make this layout.

29/08/16

Suminagashi

This post is in Italian and English
Ieri ho partecipato a un corso di carta marmorizzata con l'antica tecnica giapponese del suminagashi, tenuto dalla bravissima Diana di Sokio. Il suminagashi, letteralmente "inchiostro fluttuante", consiste nel raccogliere una goccia di inchiostro con un pennello e appoggiare poi la punta del pennello sulla superficie d’acqua contenuta in un recipiente, al fine di formare una piccola macchia. Con un altro pennello, intinto in una sostanza leggermente oleosa, si tocca poi la macchia in modo da farla espandere verso l’esterno, e alternando l’uso dei due pennelli si fa in modo di creare disegni. Si raccoglie infine l'immagine ponendo sull'acqua un foglio fino a completo assorbimento. Il disegno e il risultato finale ottenuti con questa tecnica non vengono premeditati e decisi dall’artista: il movimento che l’inchiostro fa sull’acqua infatti, dipende sia dallo stato d’animo momentaneo dell’artista, sia dal movimento causale dell’acqua.
Inizialmente questa tecnica aveva uno scopo divinatorio: si credeva infatti che, attraverso le tracce di inchiostro diluite nell’acqua, si potesse leggere il futuro. I monaci zen hanno fatto del suminagashi una tecnica di meditazione attiva: attraverso i disegni fluttuanti sull'acqua si raggiunge infatti un completo stato di rilassamento e di benessere attraverso la semplice gestualità rituale. Qui trovate un video tutorial di questa affascinante tecnica. / yesterday I attended a Suminagashi workshop (you can find a video tutorial of this technique here, and here you can find a detailed explanation and projects).

Questi sono i miei lavori di ieri, non vedo l'ora di utilizzarli in qualche progetto scrap!/These are my suminagashi works, I can't wait to use them in some scrapbooking projects!


*fonte testo

23/08/16

Flip book

This post is in Italian and English
Questo è il mio primo esperimento con il flip book, un tipo di mini album che sembra molto di moda in questo periodo. E' davvero facilissimo da fare, per una struttura di poche pagine come qwuesta bastano una carta pattern double e un po' di washi. Per realizzarlo ho seguito questo video tutorial. E' il secondo album per la gravidanza della mia amica, trovate l'altro qui. / This is my first attempt with the flip book, a kind of mini very popular these days. It is very simple to make it: for this album structure I only used a double patterned paper and some washi. I followed this very well done video tutorial. This is another pregnancy album for my friend, you can see the other one here.


Partecipo a/Inspired by:

22/08/16

[CreaFamily] - Tutorial mini album in cornice

Oggi mi trovate sul blog di CreaFamily con il tutorial per realizzare questo mini album "in cornice". E' un regalo per un'amica alla quale io e mio marito abbiamo fatto delle foto quando era incinta. Trovo che questo tipo di album sia molto carino da regalare perchè può essere usato come home decor e tenuto in bella vista, ogni giorno su una pagina diversa!


Vi è piaciuta questa piccola anteprima? Scoprite qui su CreaFamily il tutorial per realizzare un mini album in cornice!
Vi ricordo che nello shop di CreaFamily trovate tutto quello che vi serve per ogni esigenza creativa: basi da decorare, feltro, stoffe, crepla, fustelle per Big Shot, materiale per scrapbooking…
Nel blog invece, tante ispirazioni per i vostri progetti: cucito, scrap, feltro, lavoretti da fare con i bambini… non perdetevelo!

LISTA MATERIALI
pad geometric neon
anello apribile
cornice Ikea Tolsby

09/07/16

[DoCrafts] - Layout with Mr. Smith's workshop collection + tutorial

This post is in Italian and English
Oggi vi mostro due layout come DT per Docrafts! - vi ricordo che in Italia trovate i prodotti Docrafts da CreaFamily.
Ho utilizzato la collezione "Mr. Smith's Workshop", che è composta da carte con meravigliose texture tipo mattoni, ruggine, muri scrostati... molto adatte per pagine maschili o mixed media. Completano la collezione topper e die- cut, stickers, e altri abbellimenti. Scoprite tutta la collezione quiToday I have for you two LO with the fabulous Docrafts collection "Mr. Smith's Workshop":    it features textured papers like brick wall, decaied walls, rust... I think it is just perfect for masculine or mixed media project. It has also  stickerstoppers and die-cuts and many other embellishments. Discover the collection here.


Ho ricevuto anche questa bellissima fustella a centrino decorato, e ho abbellito la fustellata con gemme e stickers/ I also received this beautiful decorated doily die, and I embellished it with gemstone and stickers: 


Product used
Docrafts: 12 x 12" Paper Pack "Mr Smith's Workshop", Embellishments "Capsule - Geometric Kraft", Alphabet Thicker Stickers "Mr Smith's Workshop", Dies "Filigree Circle Frame", A5 Premium Cardstock Textured (75pcs), Gemstone Wheel (2mm Gems) - 12 Colours, Glitter Dot Stickers "Birdcages & Chandeliers", Stick it! 25m Double Sided Tape (9mm Width), Stick it! 18m Double Sided Tape (6mm Width), Stick it! Permanent Adhesive Roller, Tacky Glue


Questo è un altro LO realizzato sempre con la collezione "Mr. Smith's Workshop", mixata con gli abbelliementi della collezione  "Capsule Geometric Mocha"This is another LO made with the same paper collection and some embellishments from "Capsule Geometric Mocha" collection:


Product used
Docrafts: 12 x 12" Paper Pack "Mr Smith's Workshop", Embellishments "Capsule - Geometric Kraft", Embellishments “Capsule - Geometric Mocha”, Adhesive Mirror Shapes Triangles "Capsule - Geometric Mocha", Alphabet Thicker Stickers "Mr Smith's Workshop", A5 Die-cut Toppers & Sentiments "Mr Smith's Workshop", A4 Ultimate Die-cut & Paper Pack "Capsule - Geometric Kraft", Stick it! 25m Double Sided Tape (9mm Width), Stick it! 18m Double Sided Tape (6mm Width), Stick it! Permanent Adhesive Roller
Other: Labeler, Stapler


Trovate i tutorial per realizzare questi due layout qui sul sito Docrafts.Here on Docrafts site you can find the tutorial to make these layout.

28/06/16

BoBunny 2nd round DT call submission

Sorry Italian friends, this post in in English only

I am very honored to be one of the candidates for the 2nd round of BoBunny DT call, and today I show you the projects I made for it.


We all received a different package of products to work with: I received a lot of mixed media products, stencil, foil, chipboard, stamps, dies and Take a Hike collection.
They asked for a blogpost and a video tutorial, so... these are my projects:

Blogpost
(I chose the "one layout, three ways" series and made a blogpost as if it should be published on BoBunny's blog)

Hi BoBunny fans! Welcome to another post of one layout, three ways.
It’s Giorgia here with a layout using the new fabulous collection “Take a Hike”: this is one of my new favourites from BoBunny, a lovely outdoor themed collection that features earth tones and amazing prints.
I'll be sharing the three stages my layout went through before I felt it was complete. I love to add more and more embellishments on my projects but some of you may prefer clean & simple layouts, so I will show you three different styles.

Nestled in the trees by Giorgia Rossini 


First stage: I horizontally layered two stripes of patterned papers on top and bottom of the background paper. I distressed them with scissors blade to create texture - I will distress all the paper in this project - I love the rustic feeling of distressed paper, just perfect with my forest picture! I mat the photo and glue it down in the middle of the page. Now I cut stripes of papers, distressed them and adhered them as shown (I think the vertical orientation gives the ideas of a series of trees!) I created the title using a layered chipboard and I added an arrow on the bottom of my picture. 


Second stage: I added two more arrows (repetition of the same element is a composition rule that always works to create balanced and eye-catching layouts) and a group of three different embellishments: BoBunny button, brad and chipboard. I love them!


The layout is already great at this point but I wanted to add even more details, so I created two clusters on up right and bottom left corner. Finally I get the result that I wanted!


Some close ups:


I hope you will find this layout inspiring and that you will have fun playing. Thank you so much for looking, I wish you a great day!
Ciao, Giorgia

BoBunny supplies:
Patterned Papers: Gateaway, Trails, Happy Trails, Trekkin' / Take a hike
6x6 Paper Pad: Take A Hike
Stickers: Combo Sticker / Take A Hike
Brads: Take A Hike
Buttons: Take a Hike
Chipboard: Take A Hike
Layered Chipboard: Take A Hike 
Noteworthy: Take A Hike 


Video tutorial

They asked for versatility, so... I used "Take a Hike" collection in a very different way: I created a beach themed project!
As soon as I saw the yellow paper and the fish paper in the collection and the stencil I received in my package ("under the sea" stickable stencil) I had this idea: thinking outside the box and try to make something different! Maybe I am a little bit crazy LOL. This is my final result: I made a mixed media layout using BoBunny amazing stencil, gesso, paste, foil transfer, glimmer sprays and pearlescent.


BoBunny supplies:
Patterned Papers: Compass / Take a hike
6x6 Paper Pad: Take A Hike
Stickers: Combo Sticker / Take A Hike
Brads: Take A Hike
Buttons: Take a Hike
Chipboard: Take A Hike
Layered Chipboard: Take A Hike 
Noteworthy: Take A Hike
Foil Transfer: Accents Gold
Stickable Stencils: Under The Sea 
Pearlescent: Butterscotch
Glimmer Spray: Gold
Black gesso
Crackle Paste Primer
White Crackle Paste

Other:
Palette Knife
Foam tape
B-side tape
Tacky Glue

And this is the start to finish video:


Thank you all so much for dropping by today and a special thanks to BoBunny for the opportunity to be part of their team!

*fingers crossed*

27/06/16

[Docrafts] - "So much fun" layout tutorial

This post is in Italian and English 
Ho ricevuto un pacco meraviglioso da Docraftszeppo di nuovi prodotti, come la favolosa collezione "Capsule Geometric Kraft" che ho usato in questo layout. E' composta da prodotti con il kraft come colore base e spruzzate di colori neon... davvero fantastica! "Mono""Neon" e "Mocha" sono gli altri colori, altrettanto meravigliosi, disponibili al momento./ Today I have for you a LO with the brand new and fabulous Docrafts "Capsule Geometric Kraft" collection. "Kraft" is the last Capsule Geometric color (the other amazing ones are "Mono""Neon" and "Mocha") and it features kraft base with neon accents... so cool!


Appena ho vista la collezione ho capito subito che era perfetta per questa foto notturna del luna park di Chicago! L'ho abbinata al cartoncino nero per richiamare appunto la notte, e questo è il risultato./ As soon as I looked at the new collection I realized it was just perfect for my Chicago luna park by night picture. I combined it with black cardstock to recreate a night effect. 


I favolosi pack di die-cut e gli stickers permettono di realizzare un fantastico layout in davvero pochissimo tempo/ Die-cut packages and stickers let you realize a fab layout in minutes!


Product used
Trovate il tutorial qui sul sito Docrafts.Here on Docrafts site you can find the tutorial to make this layout.


Template by BloggerCandy.com | Header Image by Freepik